

Dash Pro User GuideEverything your display does, and how to make it do it.
This guide covers the Dash Pro display, the three-button remote and the FabiRide app. Start with Will it fit my bike? if you have not bought yet, or Setting up if the display is already on the bars.
What Dash Pro does
Dash Pro sits between your controls and your motor. That is the whole idea, and it is why it can do things a screen bolted on top of your controller cannot.
Most displays report. They read a number from the controller and draw it larger. Dash Pro reads the same numbers, but it also sits in the path your throttle and brake take on the way to the motor. It can therefore hold a speed limit on a controller that has no idea what a speed limit is, ease power off when the front wheel comes up, and hand the bike back exactly as the factory left it the moment you switch it off.
Everything else follows from that position: the assists, the limiter, the per-rider limits that stay on the bike whether or not a phone is anywhere near it.
What you get
How to read this guide
Chapters 2 to 6 get you riding. Chapters 7 to 16 cover one feature each, so you can skip straight to the one you want. Chapter 19 is the one to bookmark: error codes and the fixes for the problems people actually hit.
Where a feature only exists on some bikes, it says so. The capability matrix in Chapter 3 is the single page that answers “does mine do this”.
The display shows a small fixed set of English words. That stays English whatever language you set the app to, so the labels in this guide match what you will see on the screen.
Safety first
Read this chapter before you ride. The notices here are repeated later beside the features they apply to, which should tell you how seriously to take them.
Set up and configure the bike while stationary. Never operate the app or change settings while riding.
Keep your eyes on the road. The display is built to be read at a glance. Do not read screens, answer calls or use the intercom in traffic where it would distract you.
Speed and power
Increase settings gradually and test in a safe, open area away from traffic before riding normally. A bike that behaved one way this morning can behave differently after one slider moves.
Road-legal speed and power limits vary by country and by vehicle class. Riding within the law is your responsibility. Removing a restriction may affect your insurance, your registration and your warranty.
Rider assists
Wheelie control, drag anti-flip, traction control and cruise control depend on sensors and are affected by conditions, surface, load and setup. Never rely on them to keep you safe.
Wheelie and drag assist limit lift. They do not perform a wheelie. Only use them somewhere you could safely lose control.
Cruise control releases when you pull the brake lever. It does not release for engine braking or regen. Do not use it in traffic, on loose surfaces or in poor conditions.
Crash detection
Crash detection may not detect every incident, and may occasionally trigger without one. It is not a substitute for riding within your limits or for carrying a phone with signal. Test your emergency contacts before you rely on them.
Battery
Plan a margin. Cold, load, terrain, speed and battery age all reduce range. Treat the number as a guide, never as a promise.
Installation
Installation involving the bike’s throttle, brake or controller wiring should be carried out by a competent person. Incorrect wiring can cause loss of power or unintended acceleration.
After any wiring change, re-run calibration and check throttle and brake behaviour with the bike stationary and the rear wheel off the ground.
Water
It is protected against dust and against water falling straight down. It is not sealed against heavy rain, spray or washing, and water damage from those is not covered by the warranty. This matters enough to have its own chapter: read Water, dust and looking after it before your first wet ride.
Will it fit my bike?
Dash Pro works with eleven controller families across a 12 V to 98 V range. You pick your family during setup and can change it at any time - no re-flashing, no new hardware, no second display.
Power and voltage
The display runs on anything from 12 V to 98 V and takes its power from the bike. There is nothing separate to charge and nothing to convert. That range covers a 12 V accessory feed at one end and a high-voltage build at the other, with 48 V, 52 V, 60 V and 72 V packs comfortably inside it.
A pack reads higher straight off the charger than the number printed on it. A nominal 72 V pack sits at about 84 V fully charged, and it is that higher figure which has to stay inside the range. If your pack charges above 98 V, the display cannot be powered from it directly.
The eleven families
| Family | Fits | Worth knowing |
|---|---|---|
| SiliXcon LYNX | ETMX and custom high-power builds | The deepest integration of the eleven. Full map editing. Over 25 controller models recognised automatically. |
| Talaria | Sting MX3, MX4, MX5, XXX, Komodo | Model detected automatically. Riding modes and power ceiling follow the model. |
| ASI | BAC355, BAC555, BAC855, BAC2000, BAC4000, BAC8000 | Model estimated from the controller’s own rating. Gets a dedicated Power & Battery page. |
| SurRon | Light Bee X, 2025 and earlier | ECO and SPORT switchable from the display. The controller’s stored configuration is left alone. |
| VESC | VESC 6 and open-source controllers | Readout and assist levels. The controller’s stored configuration is left alone. |
| Bafang | BBS01, BBS02, BBSHD mid-drives | Full configuration editing. Pedal-assist bike. |
| Riding Times | GT2000, GT54, GT54 PRO, GT73 | You pick your model during setup. On the GT2000 the power figure is an estimate - see below. |
| FarDriver | ND and CN series | Three ways to connect; you pick during setup. Gear selection is set on the bike. |
| King-Meter | KM5S, J-LCD, 901U, SW-LCD | Display type detected automatically. Also fits MATE X and stock Lishui bikes. |
| KT / KunTeng | KT-LCD3, LCD5, LCD8, SW900 and similar hub kits | Full P- and C-parameter editing. |
| Torp | TC500 and TC1000 kits fitted to SurRon Light Bee, SurRon Ultra Bee and Talaria MX3, MX4 | Replaces the optional Torp display. Riding modes and reverse move to the bars. The controller’s stored configuration is left alone. |
What works on what
This is the page to photograph. Everything in the manual that says “where supported” means this table.
| Feature | SiliXcon | Talaria | ASI | SurRon | VESC | Bafang | Riding Times | FarDriver | King-Meter | KT | Torp |
|---|---|---|---|---|---|---|---|---|---|---|---|
| Live dashboard and ride data | ● | ● | ● | ● | ● | ● | ● | ● | ● | ● | ● |
| Motor and controller temperature | ● | ● | ● | ● | ● | – | – | ● | – | ● | ● |
| Riding modes and assist levels | ● | ● | ● | ● | ● | ● | ● | shown | ● | ● | ● |
| Edit controller settings | ● | ● | ● | – | – | ● | ● | ● | ● | ● | – |
| Limit to any speed you choose | ● | ● | ● | ● | ● | ● | ● | ● | ● | ● | ● |
| Lift the limit from the app | ● | ● | ● | ● | ● | ● | ● | ● | ● | ● | ● |
| Raise the bike above stock | ● | ● | ● | – | – | ● | ● | ● | ● | ● | – |
| Pedal assist settings | – | – | – | – | – | ● | ● | – | ● | ● | – |
| Lights | ● | – | ● | – | – | ● | – | – | ● | ● | – |
| Reverse | ● | – | ● | – | – | – | – | – | – | – | ● |
| Cruise control | ● | ● | ● | ● | ● | – | ctrl | ctrl | ctrl | ctrl | ● |
| Wheelie and drag assist | ● | MX5 | ● | – | ● | – | – | – | – | – | ● |
| Traction control | ● | ● | ● | ● | ● | – | – | – | – | – | – |
| Throttle response curve | ● | ● | ● | ● | ● | – | ctrl | ctrl | ctrl | ctrl | ● |
| Brake and regen curve | ● | MX5 | ● | – | ● | – | – | – | – | – | ● |
| Detailed battery and cell data | ● | ● | – | ● | – | – | – | – | – | – | – |
● the display runs itctrl – supported, set in the app, run by your controllershown – displayed only, set on the bikeMX5 – that Talaria model only– not available
On SurRon, traction control, cruise control and the throttle curve need your throttle to run through the display. The setup wizard asks. If you answered that your throttle goes straight to the controller, they will not appear.
Why some rows are empty
The rider assists work by sitting between your controls and your motor, so they need your throttle - and for wheelie and regen, your brake lever - to run through the display. On pedal-assist hub kits the throttle wires straight to the controller, so those features do not apply.
On VESC, SurRon and Torp, Dash Pro reads everything the controller reports and switches its riding mode, but does not rewrite the controller’s stored settings.
Detailed battery data depends on your battery pack, not only on your controller.
Works on every bike, whatever the controller
Navigation. Track mode. Acceleration test. Ride recording and tracking. Crash detection and SOS. Music, calls and notifications. Group voice. Rider sharing and family limits. Phone-as-key. Cloud backup. Wireless firmware updates.
Talaria models
| Model | Also called | Riding modes | Peak power |
|---|---|---|---|
| MX3 | – | ECO · SPORT | 6.0 kW |
| MX4 | Sting R | ECO · SPORT | 8.0 kW |
| MX5 | – | ECO · SPORT · HYPER | 13.4 kW |
| XXX | Talaria X3 | ECO · SPORT | 5.5 kW |
| Komodo | – | TBC | TBC |
The model is detected automatically, and you can override it if your bike is misidentified. Sliders are bounded by the model’s peak power, so a setting can never ask for more than the motor can give.
MX5 is the only Talaria wired for the display’s brake path, which is why wheelie assist, drag anti-flip and the brake curve are MX5-only in the matrix above. The Komodo is set up like the rest of the range but does not get those three.
SurRon
Light Bee X, 2025 and earlier. ECO and SPORT switch from the display, with the + and − buttons or from the app, so you no longer have to reach down to the bike’s own switch. The controller’s stored configuration is not rewritten.
SurRon installs vary: on some bikes the throttle goes through the display, on others straight to the controller. The setup wizard asks which, and your answer decides whether traction control, cruise control and the throttle curve are available to you.
ASI
Models BAC355 through BAC8000, estimated from the controller’s output-current rating. Where the reading falls between two known models the app shows no model badge at all rather than a wrong one. A missing badge is not a fault.
ASI’s highest settable speed is 127 km/h (79 mph). Every other family allows up to 200 km/h (124 mph), further bounded by whatever maximum your own controller reports.
Riding Times
GT2000, GT54, GT54 PRO and GT73. You pick your model during setup. Speed, the battery window and the assist steps are all scaled to the model you choose, so getting it right is what makes every other number right.
The GT2000 is the pedal-assist bike of the family, and it does not report current. Its power and current figures are therefore estimates worked out from how the pack behaves. The app labels them “est.” and you should read them that way: useful for comparing one moment to the next, not for quoting.
FarDriver
Three connection methods. You pick one during setup and can change it later. Gear selection is set on the bike itself and shown, not set, by the display.
Torp
TC500 and TC1000 kits fitted to a SurRon Light Bee, a SurRon Ultra Bee or a Talaria MX3 or MX4. Dash Pro replaces the optional Torp display: riding modes and reverse move to your handlebars and to the app, and you get the full readout, motor and controller temperature included.
The controller’s own stored configuration is not rewritten. Because there is nothing to write into it, a Torp speed limit is held by the display itself, which means your throttle has to run through the display for a limit to be in force. The setup wizard asks. If you answer that your throttle goes straight to the controller, the app tells you so rather than showing a limit that is not actually being applied.
Wheelie assist and drag anti-flip are available on Torp. Traction control is not: it needs a wheel-speed reading this controller does not give, and it will be switched on when it has been proven on a Torp bike, not before.
Torp kits are set up slightly differently depending on which bike they are fitted to. You pick your base bike during setup and the app takes care of the rest.
Drivetrain
Every family needs drivetrain data before speed and range can be right. Get this wrong and every number on the screen is wrong with it.
Presets: SurRon · Talaria · E-TMX eX2 · Bafang BBSHD · Hub motor (gearless) · Hub motor (geared) · Custom.
| Setting | Applies to | Notes |
|---|---|---|
| Wheel diameter | All | In inches. |
| Rim + tyre | Moto wheels | A 19″ rim with a 70/100 tyre, for example. The app works out the true rolling diameter, which a nominal inch figure will not give you. |
| Rear sprocket | Chain drivetrains | Tooth count. More teeth means lower top speed and more torque. |
| Gear ratio | Geared hub, Custom | Entered directly. |
| Motor type | All | Hub (in the wheel, 1:1) · Hub geared (internal reduction) · Mid-drive (chain or belt). |
| Motor sensor | Where supported | Rotor-position feedback type. |
| Motor thermistor | Where supported | The sensor type in the motor loom. SurRon uses a different one from the common type; the app lists it. |
Setting up
Fifteen minutes, most of it the wizard asking about your bike. You need the display fitted and connected, a phone with Bluetooth, an internet connection for the first setup, and your purchase invoice.
Turn it on
Hold the power button for 3 seconds. The FabiRide logo appears, then a welcome message asking you to install the app.
Your controller is live whenever the battery is connected. The power button turns the display on and off. It does not switch the bike off.
Create your account
- Install FabiRide from the App Store or Google Play.
- Sign up with your name, email, phone number, country and a password, and accept the terms. On iPhone, Sign in with Apple is offered where the build supports it.
- One account holds every bike, every battery and every rider you will ever add. You will not need a second one.
The app does not touch Bluetooth until you are signed in, so on a fresh install there is no permission prompt before that point. Nothing is wrong. Sign in and it will appear.
Pair the display
- Open the Garage tab, tap +, then Connect.
- The app scans and lists displays nearby by name. Tap yours.
- There is no code to type and nothing to hold down. The serial number is read automatically, and the display’s welcome message changes to “Phone connected - complete setup on the phone.”
Register the display
The app moves to registration on its own. Select the shop you bought from, enter the invoice or order number, and attach a photo of the invoice.
Registration is what links this display to your account. It is required for your warranty, for firmware updates and for rider sharing, and it is what stops anyone else claiming the display as theirs.
The setup wizard
Twelve steps, and you will not see all of them. The wizard shows only what applies to your bike.
| # | Step | What you do | Shown when |
|---|---|---|---|
| 1 | Pick your protocol | Choose your controller family from the eleven | Always |
| 2 | FarDriver connection | Choose which of the three connection methods your bike uses | FarDriver only |
| 3 | Check controller wiring | Let the display find the correct wiring itself, or skip and set it later | Controllers that can be wired either way |
| 4 | Pick your bike model | Confirm or override the detected model. This sets wheel size and defaults | Families with models |
| 5 | Protocol verified | Nothing. This is the display confirming it is talking to your controller | Always |
| 6 | Wire throttle | Confirm whether your throttle runs through the display | Not on hub kits |
| 7 | Wire brake | Confirm whether your brake runs through the display | Not on hub kits |
| 8 | Calibrate throttle | Twist to full and release, three times | If the throttle runs through the display |
| 9 | Calibrate brake | Squeeze fully and release, three times | If the brake runs through the display |
| 10 | Wheel size | Enter your wheel, or your rim and tyre | Always |
| 11 | Units | km or miles, °C or °F | Always |
| 12 | Display layout | Pick one of the 14 dashboard designs | Always |
Then name the bike, and you are done.
Steps you will not see on a hub kit
Bafang, Riding Times, FarDriver, King-Meter and KT always wire throttle and brake straight to the controller. Steps 6 to 9 are skipped and the display’s own throttle and brake inputs are switched off, so no false throttle fault can occur.
Calibration
Twist the throttle fully and release, three times: minimum and maximum are captured automatically. Squeeze the brake fully and release, three times. Calibration is stored on the display and survives power cycles. Re-run it from More → Calibration whenever you change anything in that wiring.
If setup gets interrupted
Nothing is lost. Re-run the wizard any time from More → Setup wizard, redo pairing from the Garage, and anything you already saved stays saved.
Using the display
A colour touchscreen with three buttons, mounted in portrait on any handlebar.
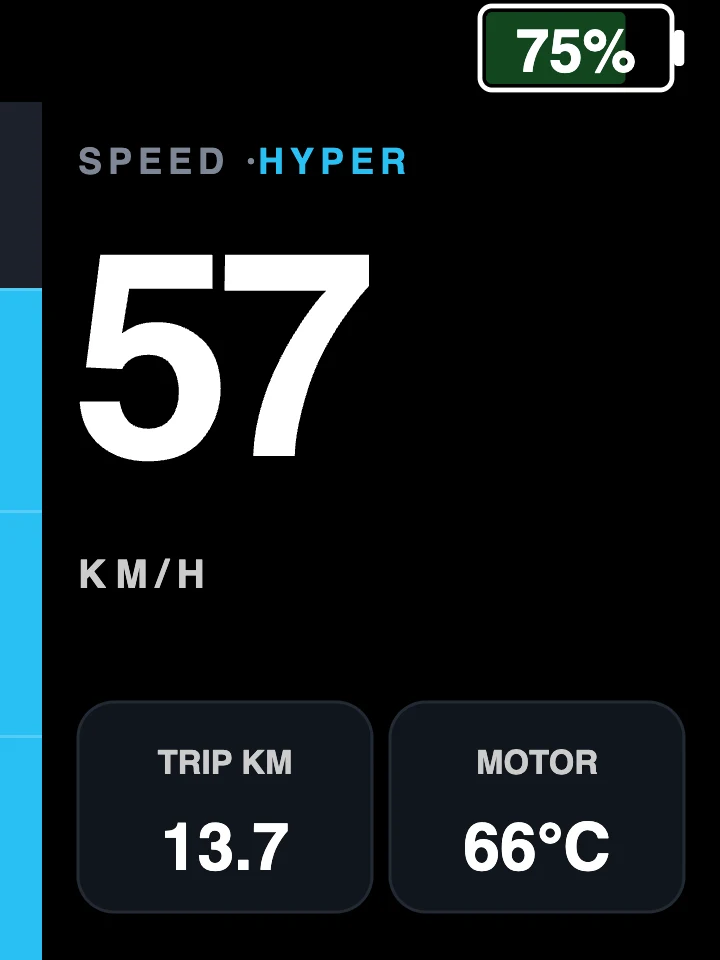
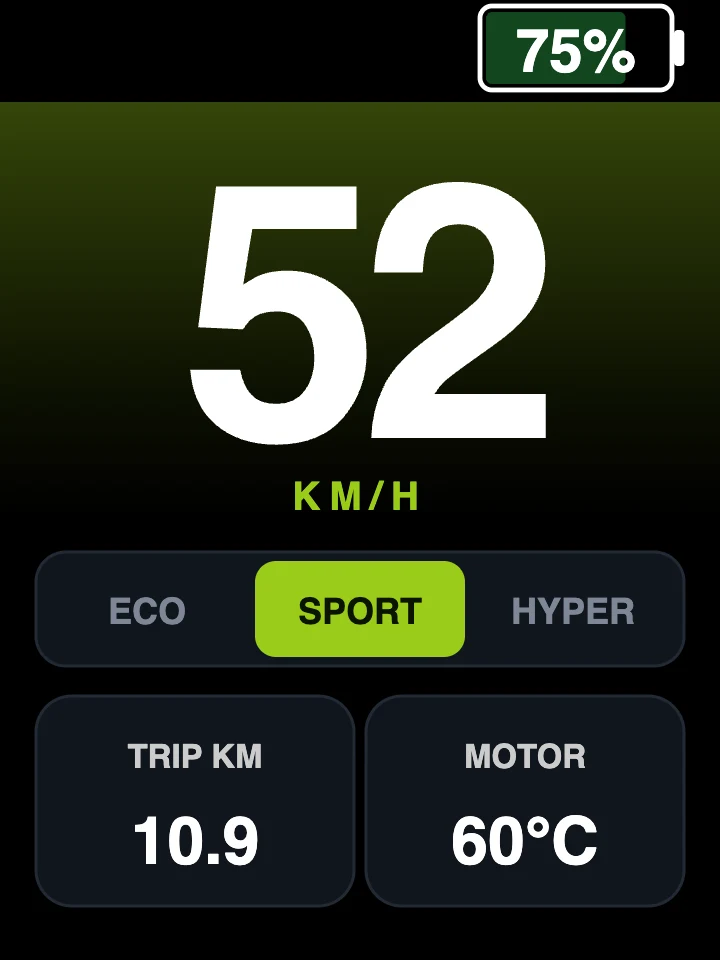
The 14 dashboard designs
Pick one in More → Display settings → Portrait variant. Change it as often as you like. These are the real renders, at the size they are drawn.
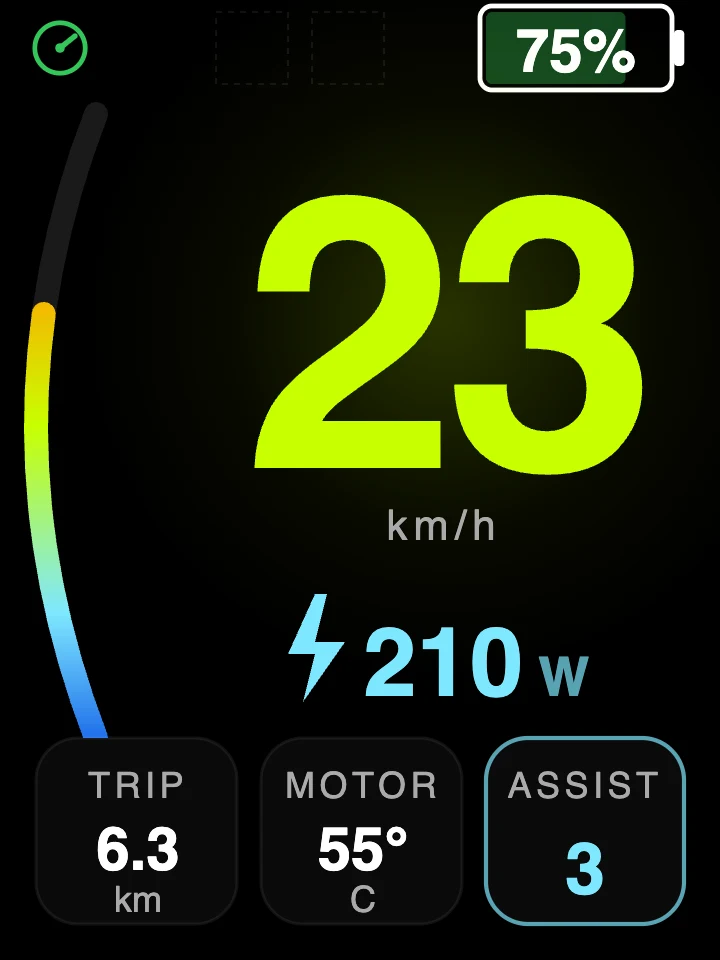
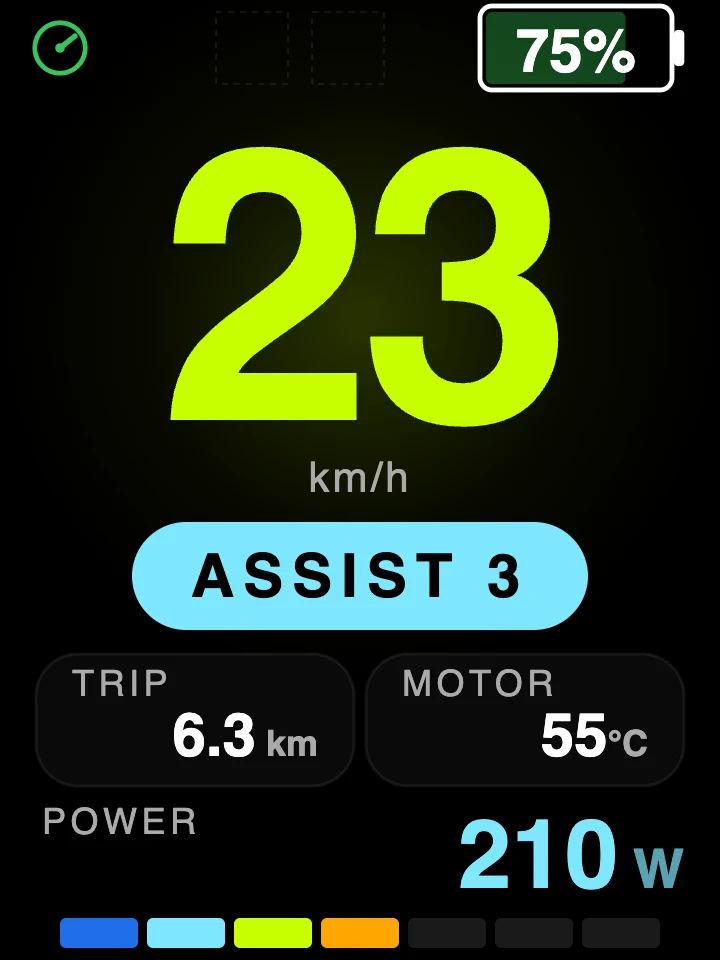
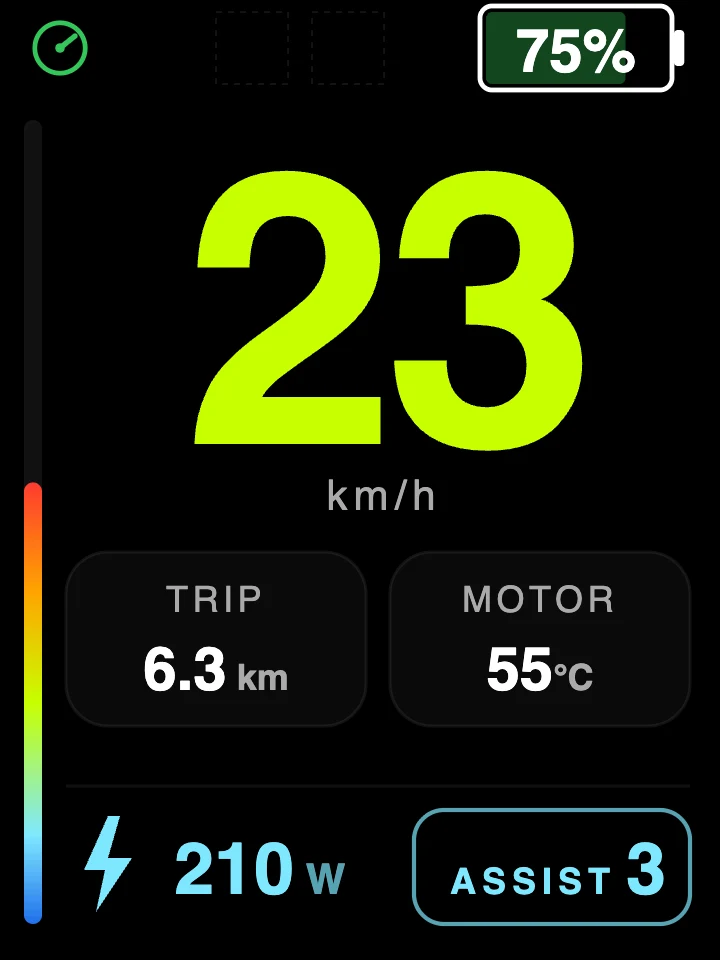
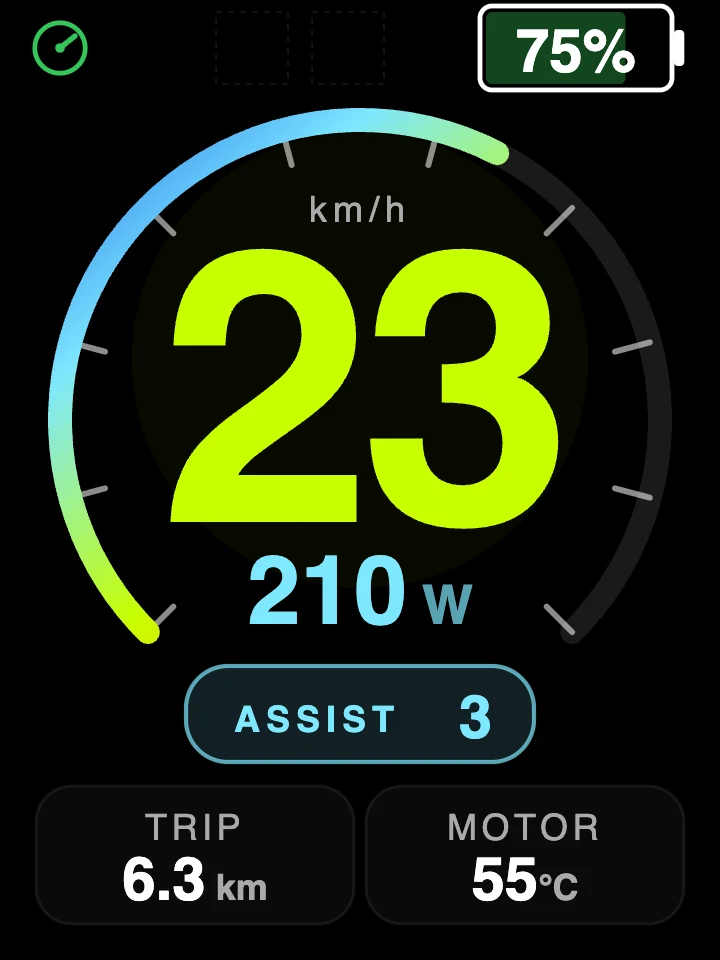
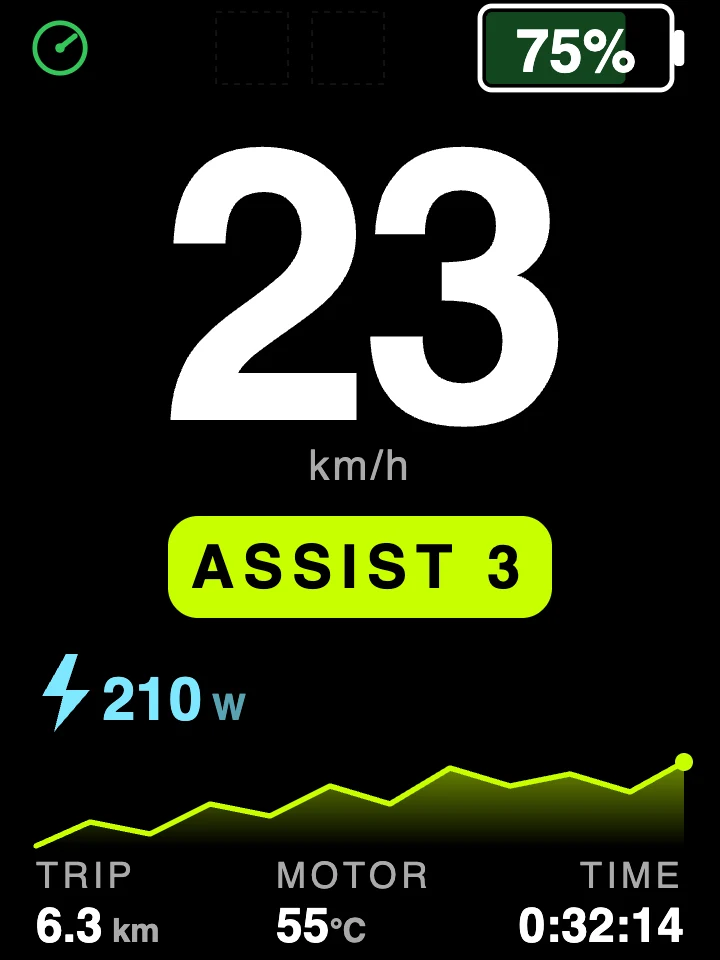
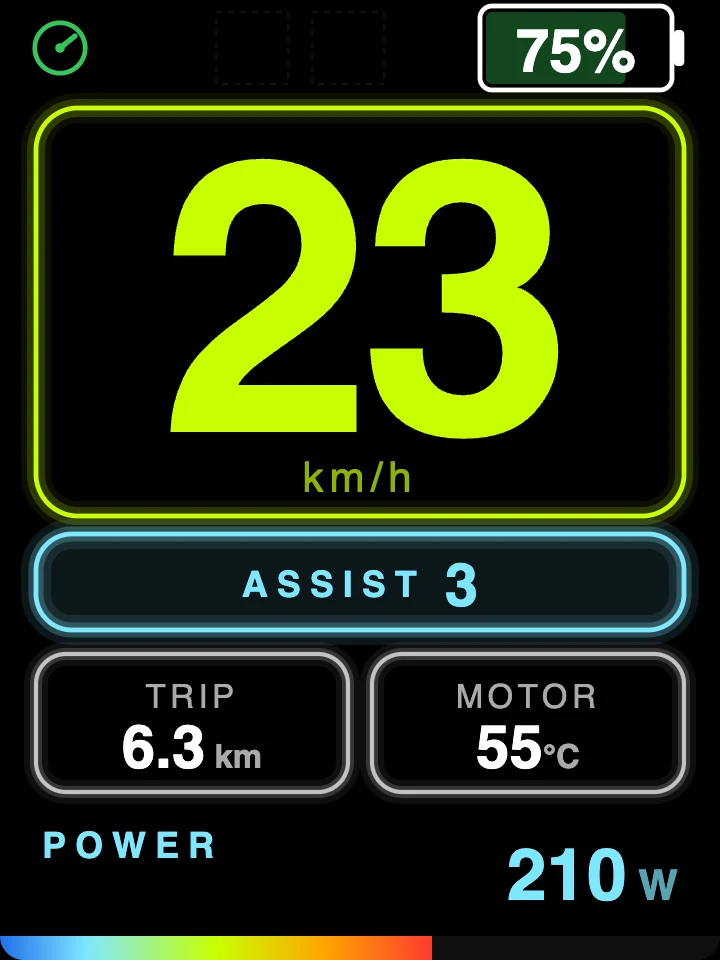
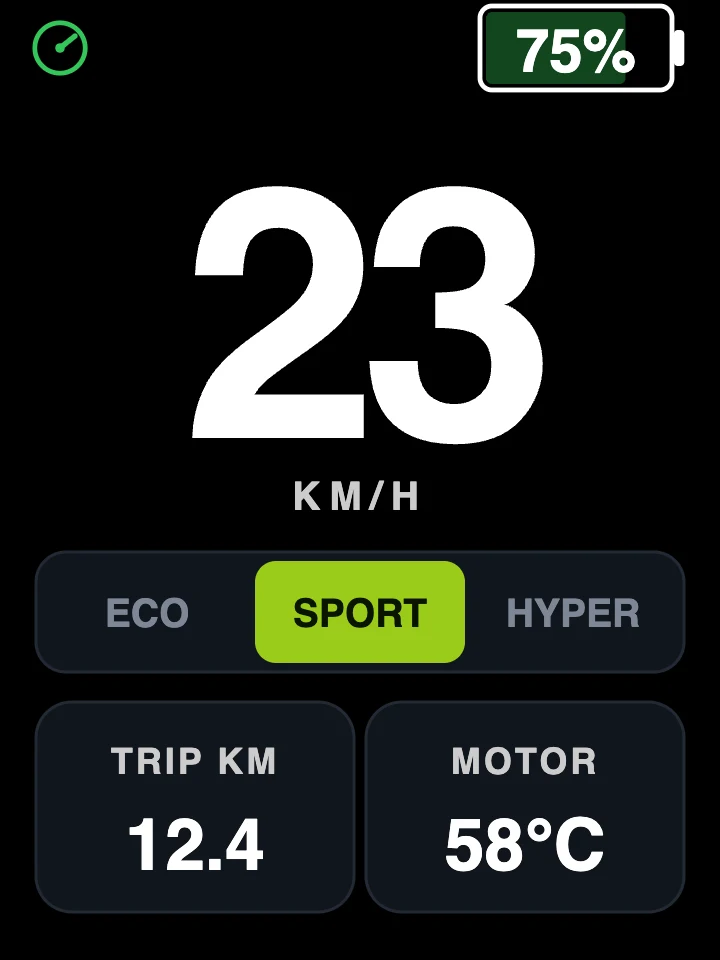
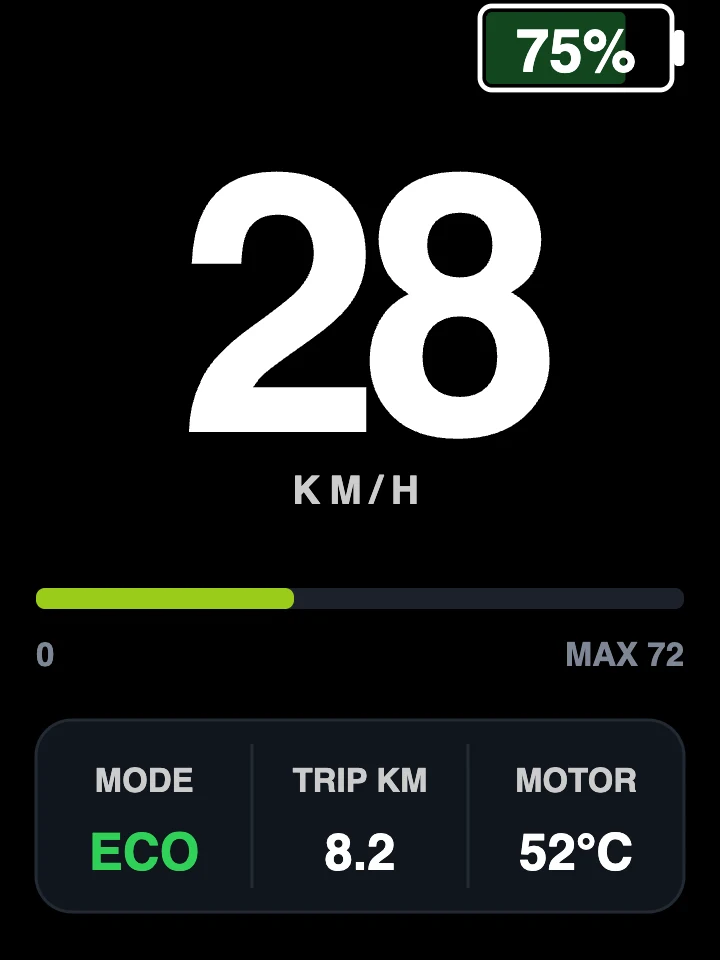
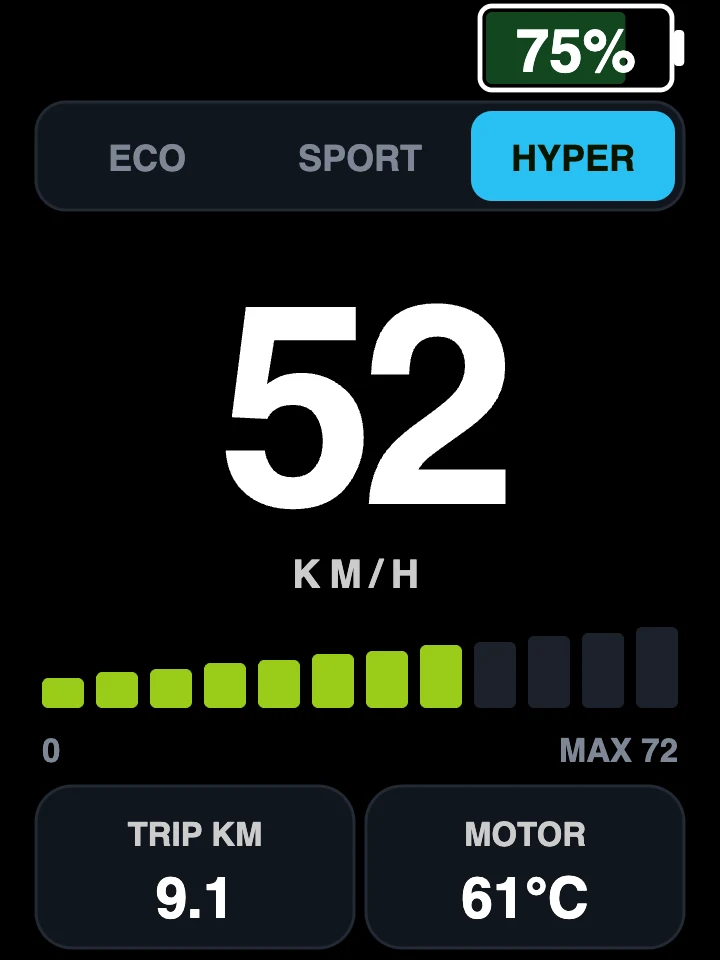
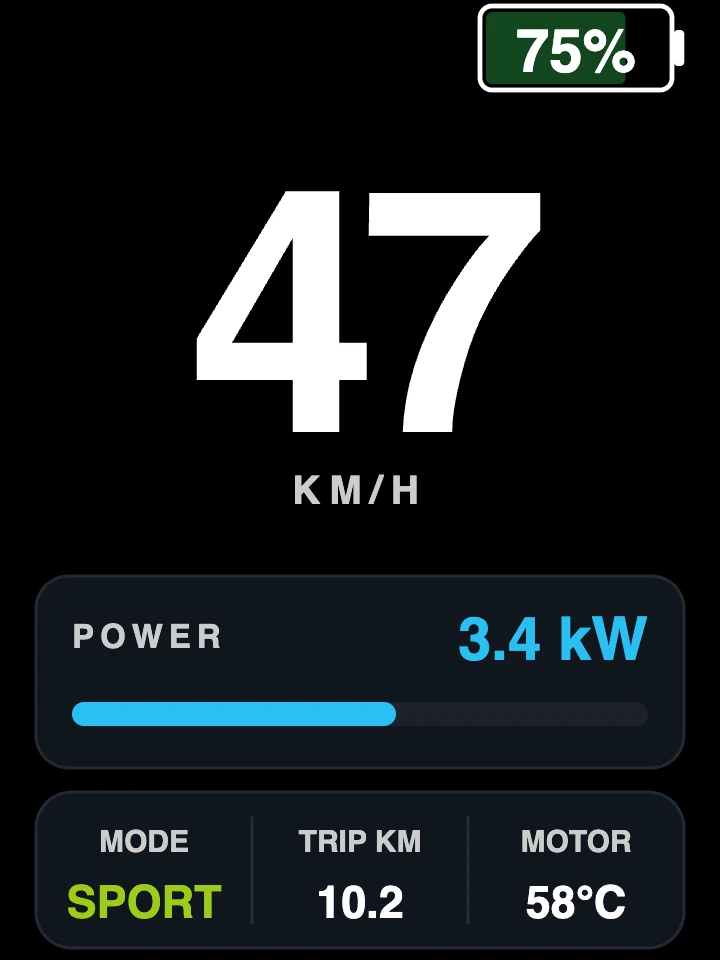
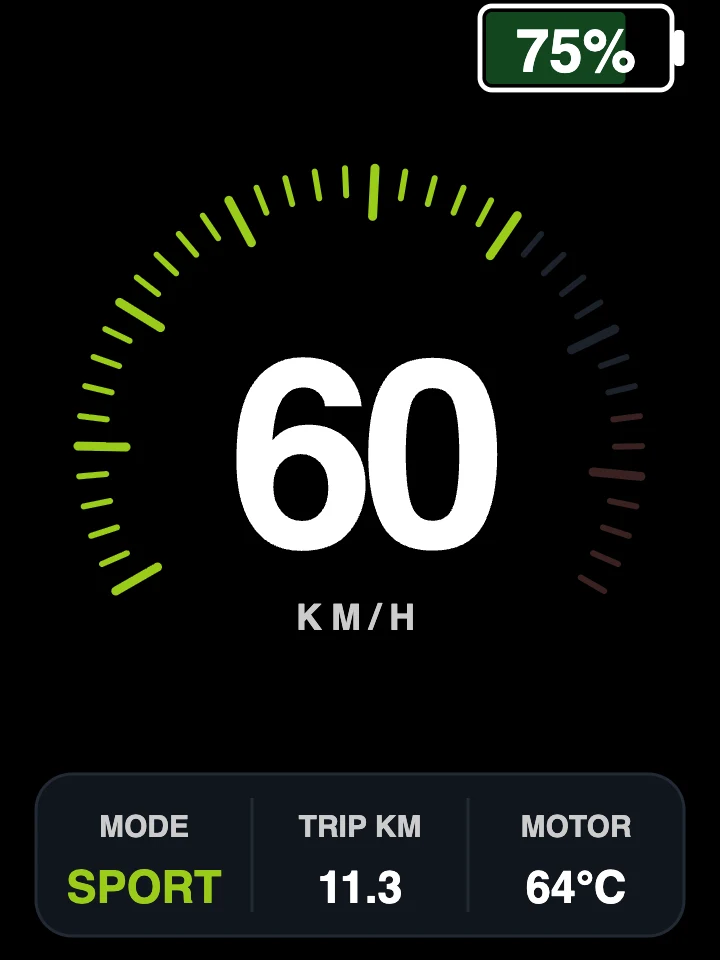
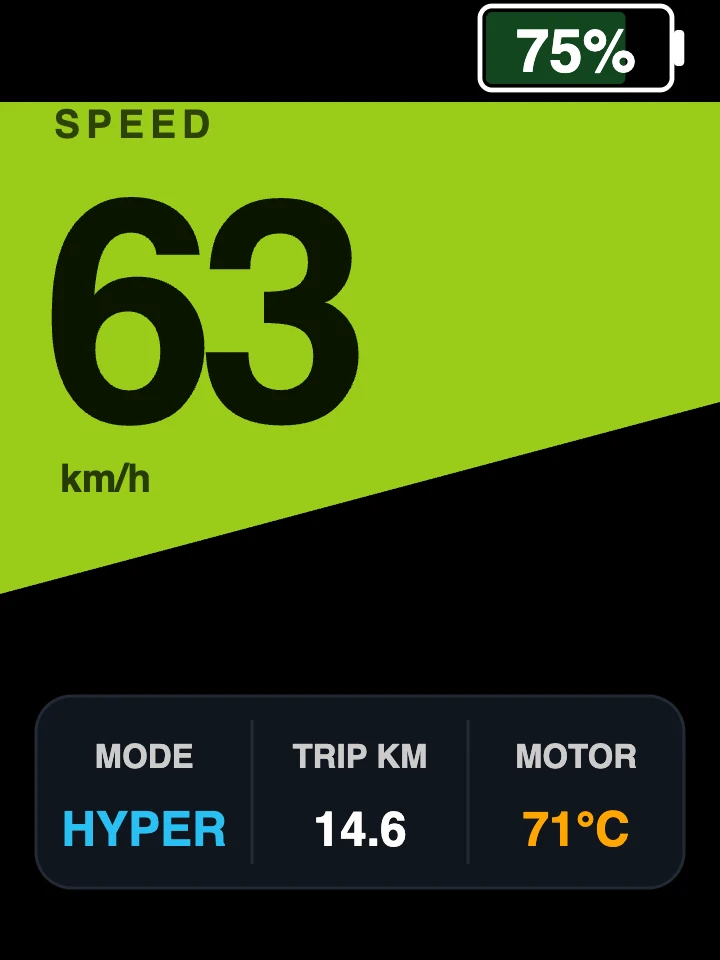
The riding dashboard
| Field | Shows | Options |
|---|---|---|
| Speed | Current speed, large | km/h or mph |
| Battery | Charge or pack voltage | % or V |
| Riding mode / assist level | Current mode or level | Shows N or D while the limiter is on, and R in reverse |
| Power | Motor power or draw | W · kW · A · Wh/km · Wh/mi |
| Temperature | Motor or controller | °C · °F · off |
| Trip | Distance this session | km or miles |
| Total distance | Lifetime distance | km or miles |
| Ride time | Time since power on | h:m |
| Wheelie angle | Live lift angle | Only when the assist is on |
When the bike is putting energy back into the battery the power readout goes below zero. The power bar stays at zero, because the bar shows draw only. Session records and trip energy count only the power you used, so regen can never flatter them.
Indicators
Every screen
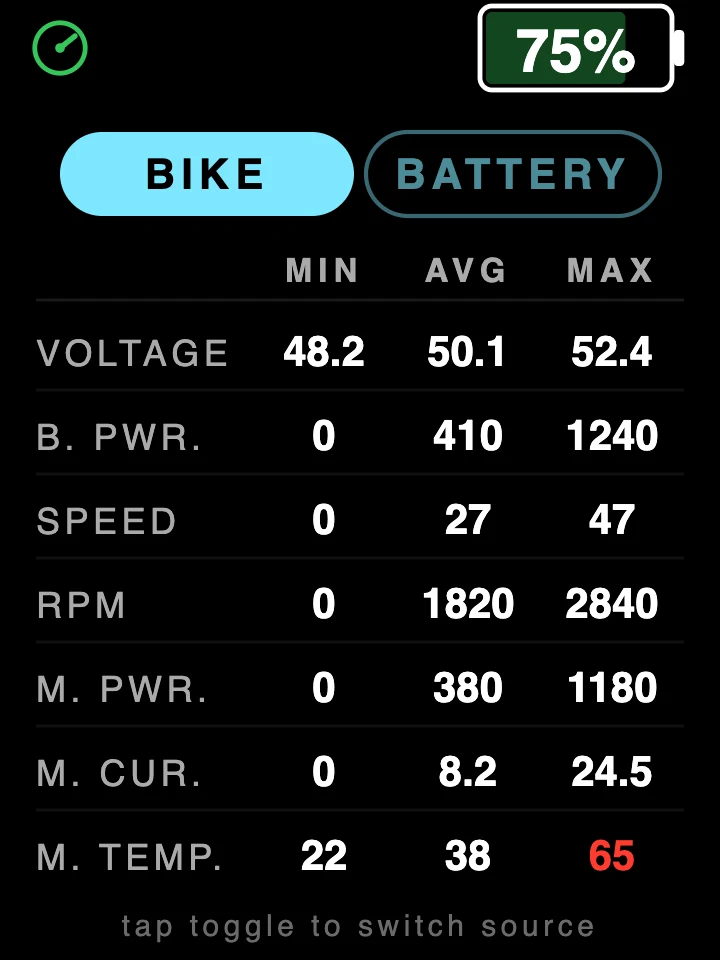
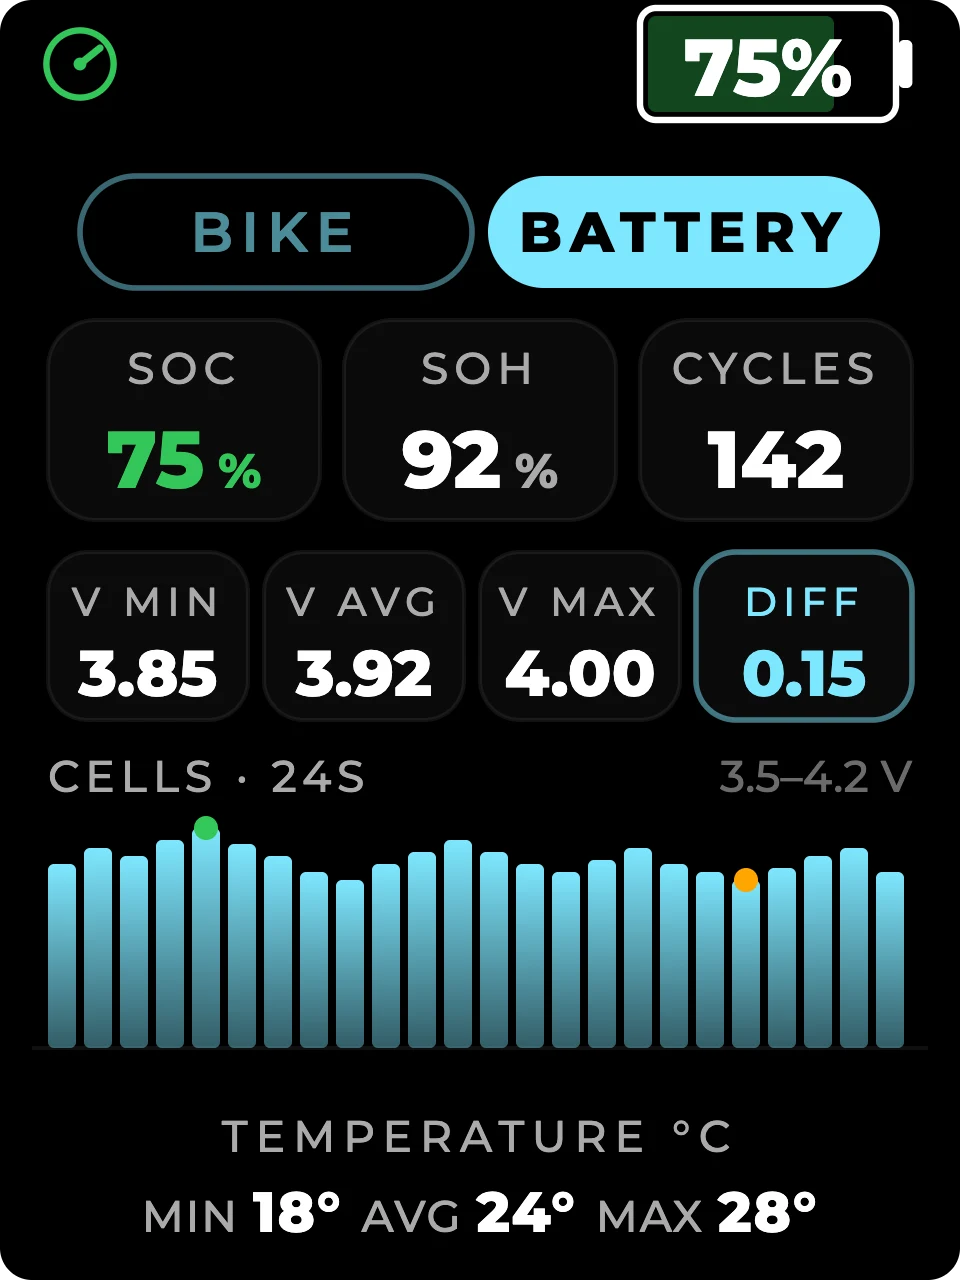
| Screen | How to reach it | What is on it |
|---|---|---|
| Riding dashboard | Default | The table above, laid out by whichever of the 14 designs you chose |
| Status | Power button from the dashboard | Max and average speed, trip, ride time, energy used, total distance, motor and controller temperature |
| Statistics - Bike | Swipe down, tap BIKE | Minimum, average and maximum for pack voltage, battery power, speed, motor RPM, motor power, motor current and motor temperature |
| Statistics - Battery | Swipe down, tap BATTERY | Charge, health and cycles; minimum, average, maximum and spread cell voltage; a per-cell bar chart up to 24 cells; temperature footer |
| Wheelie tuning | Swipe right to left | Live lift angle on a protractor, target and limit angles, calibration and re-zero |
| Music | Swipe up, or double-press the power button | Album art with a progress ring, title and artist, transport, volume |
| Navigation | Automatically while navigating | Next turn and distance. Also appears as a strip over the dashboard |
| Track | Automatically during a track session | Live lap delta, last lap, best lap |
| Crew intercom | Hold − and + together for 2 s, or swipe left to right | Who is speaking, their speed, power and mode, music row, volume |
| Incoming call | Automatic | Caller name and number, Decline and Accept. Your speed stays visible |
| Call in progress | After accepting | Full-width End control, call duration |
Navigation and Track only join the button cycle while that session is live, so they never get in the way on an ordinary ride.
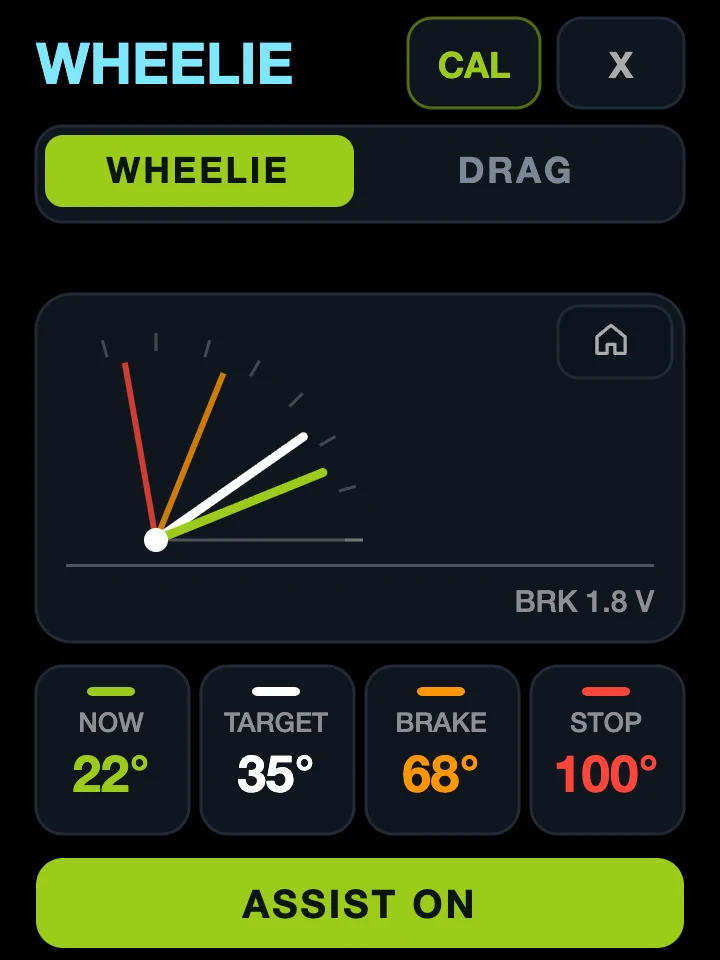
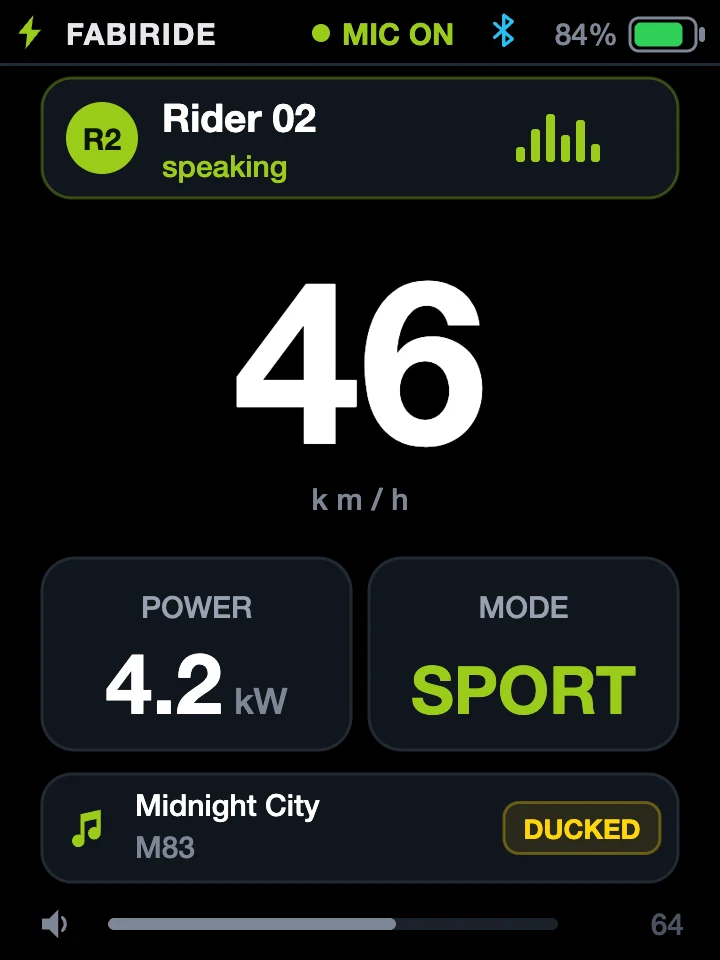
Other things it shows
A startup logo on power-on and an animation on power-down. The welcome message before it has been paired. “Updated to version…” on the first start after a firmware update. Confirmations when you change riding mode, nudge the cruise speed or reset the trip. A fault card while a throttle or brake fault is latched, and an error overlay while a fault is active. And a which-phone chooser when two phones both want control, which only ever appears at a standstill.
Display settings
More → Display settings
| Setting | Options | Default |
|---|---|---|
| Portrait variant | The 14 designs, A to N | Arc (A) |
| Distance | km · mi | km |
| Temperature | °C · °F · off | °C |
| Temperature source | Motor · Controller · Both, alternating every 5 s | Controller |
| Battery | % · V | % |
| Primary power | W · kW · A · Wh/km · Wh/mi | kW |
| Brightness | 0 to 100 % | – |
| Auto power-off | Off · 1 min · 5 min · 10 min · 30 min · 1 hour | 5 min |
The three buttons
Looking at the display: the − button, the + button, and the power button. Every mid-ride action is one of these. Nothing here needs the touchscreen and nothing here needs your phone.
| Button | Hold | What happens |
|---|---|---|
| power | hold 3 s | Power on, or power off |
| power | press | Next screen, or wake the screen if it has gone dark |
| power | double-press | Open or close the music screen |
| + | press | Assist level or regen level up |
| − | press | Assist level or regen level down |
| + | double-press | Next riding mode: ECO to SPORT to HYPER. Talaria, on the dashboard |
| + | hold 2 s | Lights on or off |
| − | hold 2 s | Cruise control on or off. Walk assist on Bafang, which releases when you let go |
| − | press 3 times | Reverse on or off. SiliXcon and ASI |
| − + | hold 2 s | Open or close the crew intercom |
| − + | hold 5 s | Reset the trip counter |
| − + | hold 3 s | Acknowledge a throttle or brake fault, while the fault card is showing |
| − | hold 3 s | Cancel a crash alert. The countdown pauses while you hold |
| + then power then hold − | 3 s on the last | Limiter on or off |
| − | hold 0.6 s | Push to talk, on the intercom screen |
On the music screen
− and + skip tracks. Hold either to change the volume, which repeats while you hold it. Three quick presses of − skips several tracks at once.
On a call
− declines an incoming call, and ends one you are on. + accepts.
Assist and mode rules
Touch
| Swipe | Result |
|---|---|
| Down | Open statistics |
| Up, from statistics | Back |
| Up | Open music |
| Down, from music | Back |
| Right to left | Open wheelie tuning |
| Left to right | Open the crew intercom, or back from wheelie |
| Right to left, on the intercom | Leave the intercom |
| Tap the trip figure | Trip reset confirmation |
Swipes are ignored while an incoming call or the which-phone chooser is on screen, so you cannot dismiss a call by accident.
Using the app
Free on iPhone and Android. The same account works at my.fabiride.com if you would rather set the bike up on a laptop.
The tabs
What is under More
Bike & protocol
The page that describes your bike to the display: protocol, bike model, controller model and ratings, controller serial and firmware, connection method on FarDriver, wiring orientation with an automatic wiring check, communication verification, lights configuration, wheel diameter, rim and tyre, rear sprocket, motor type, motor sensor, motor thermistor, throttle and brake routing, save to controller, and a bike-in-service switch.
Controller settings, family by family
You will only ever see the settings your controller genuinely supports. Nothing is greyed out to tease you.
The other settings pages
| Page | What is on it |
|---|---|
| Thermal | Motor, controller and display temperature sources · which the display shows · motor thermistor profile |
| Calibration | Live channel voltage · calibrate, save, cancel |
| Check wiring | Automatic wiring check · manual override |
| Crash detection | On or off · orientation calibration · throttle cut · regen auto-stop · SOS alerts · auto-call first contact · display beeper · sensitivity · SOS countdown length · emergency contacts, each with a phone number and an email |
| Phone-as-key & security | Allow without phone · auto-unlock range · auto-lock when away · lock on app close · PIN backup · request and enter an unlock code · authorised phones |
| Phone & media | Notification access · calls · show on display · album art · show during ride · skip with display buttons · which notification types · bonded phones · forget all bonded phones |
| Group voice | Talk mode · voice-activation sensitivity · noise suppression · how it works |
| Alerts | Notification preferences and the alert feed |
| Firmware update | Your firmware · latest available · channel · last checked · install |
| Import and export settings | What a profile contains · export · saved profiles · load · import from a file, a QR code or another bike in your Garage · save the current tune as a new profile · apply to a bike · reset to factory defaults |
| Advanced settings | Service mode · listen-only mode · display throttle and brake handling · motor identification · controller parameters behind an unlock code · load main · load backup · save to flash |
| Activity log | Every change made on the display, with acknowledge and clear |
| About | App version and build · connection status · display serial · display firmware · controller and its firmware · protocol · forget paired phones · reset all settings |
| Help & support | Contact support · send a diagnostics bundle · terms of use · privacy policy · share bike or display details |
| Switch bike | Your bikes with status (active, tampered, disabled, unverified) · battery · add a new bike · enter or scan an invite code |
| My account | Name · phone · country · password · notification preferences · export data · delete account |
It exists for service technicians. Changing values there can stop the bike working, and motor identification runs the motor. If you did not come to that page with a specific instruction from support, leave it alone.
Riding modes and assist levels
Change them with + and −, or in the app. What “a level” means depends entirely on what is driving your bike.
| Bike | What the buttons change |
|---|---|
| SiliXcon | Riding map, up to 10 of them |
| Talaria | Regen level on a press; riding mode ECO / SPORT / HYPER on a + double-press |
| ASI | Assist level |
| SurRon | ECO or SPORT |
| VESC | Assist level |
| Bafang, King-Meter, KT | Pedal-assist level |
| Riding Times | Assist level, as many steps as you have set. Pedal assist on the GT2000 |
| Torp | Riding mode |
| FarDriver | Nothing. Gear is set on the bike and shown here only |
Limits and off-road use
The limiter is the feature most people buy Dash Pro for. It works on all eleven families, including the ones whose controllers cannot be reconfigured at all.
Setting a limit
- In the app, choose a speed and a power limit.
- Switch the limiter on, from the app or with the button sequence on the bars.
- Where your controller accepts limits directly they are written into it. Where it does not, the display holds the limit itself, which is how it works on a stock SurRon or Talaria.
Lifting it
One tap in the app, or the button sequence from Chapter 6: press +, then the power button, then hold − for 3 seconds. Full stock performance returns instantly.
Going above stock
On SiliXcon, Talaria, ASI, Bafang, Riding Times, FarDriver, King-Meter and KT, your bike’s own ceilings can be raised. On SurRon, VESC and Torp the controller configuration is left untouched, so lifting the limit returns the bike to full stock performance and no further.
Derestricted settings are intended for closed roads, private land and off-road use. Road-legal speed and power limits vary by country and by vehicle class, and riding within them is your responsibility.
Where a bike is shared, the owner controls whether that rider may lift limits at all. See Sharing and family limits.
Rider assists
Five systems that sit between your throttle and your motor. They never fight each other: when more than one wants to reduce power at the same moment, the most cautious one wins.
Wheelie control
It measures lift angle continuously. Past the angle you asked for it eases power off. Past the maximum angle it applies the brake.
Settings: desired angle · lift limit · max angle · brake strength · response · damping · hover learn · lead time · separate brake-hold tuning · standing-zero calibration · ride calibration.
Drag anti-flip
Wheelie control set up for a launch. Power trimming starts far earlier, and the brake stays out of it until an emergency angle.
Traction control
Detects the rear wheel breaking loose and eases power. You set the sensitivity and where it applies. The live readout shows throttle percentage, slip and signal quality, so you can see it working rather than guess.
Cruise control
Holds a set speed. + and − nudge the held speed, confirmed on screen. It releases on the brake lever only, so engine braking and regen will not drop it. The app shows you live why cruise will or will not engage, which saves a lot of guessing at the roadside.
Throttle response curve
Reshapes throttle position into power. The default is a straight one-to-one response. Softening the first third makes a powerful bike manageable in the wet without giving up anything at the top.
Brake and regen curve
Shapes lever travel into braking force.
Wheelie control learns against the brake response it was calibrated with. Change the curve and that learning no longer applies, so it is discarded rather than left to act on stale data. Re-run the ride calibration afterwards.
Tuning your controller
Per-family settings are listed in Chapter 7. These rules apply to all of them.
A saved profile takes ten seconds and turns any tuning session into something you can walk away from. Do it before the first change, not after the tenth.
Battery and range
How much is left, how much you are using, and how far that will actually take you.
What your pack has to provide
Battery data reaches the display only from packs whose own battery management system shares it. Many packs, including most stock ones, share nothing at all. On those the battery screens stay empty and every other part of the display works exactly as normal, so an empty battery page is not a fault and there is no setting that will fill it.
Live data
Where the pack provides it: voltage, charge, current, power, remaining capacity, cycles, temperatures, health, per-cell voltages, pack identity and design capacity. Fields your pack does not report simply do not appear - nothing is estimated into a gap to make the screen look complete.
Range
Learned from the energy you actually use, not read off a specification. It sharpens over your first few rides as it works out what you and your bike do to a battery. It is always an estimate, and this guide will keep saying so.
Battery health
Tracked over time and carried across to a new phone with the rest of your account.
Smart battery packs
Paired as devices in their own right, with a live pack view, identity and specification, charge and discharge limits, pack switching, low-battery notifications, sharing, and finding packs nearby.
Navigation, track and performance
Navigation
Set a destination in the app. The next turn and the distance to it appear as a strip over your dashboard and on a full screen of their own. The distance countdown stays smooth between position updates rather than jumping in steps.
Track mode
Set a start-finish line by riding over it or by placing it on the map. You get live lap delta on the display, and last lap, best lap, full lap history and saved circuits in the app.
Acceleration test
A 0-to-target timer. Choose GPS or the bike’s own speed as the source. The start is detected automatically, so there is nothing to press, and every run is kept.
Music, calls and group voice
Your phone stays in your pocket. The controls are already under your left thumb.
Music
Now playing with album art, transport and volume, all from the bar-mounted buttons. Swipe up or double-press the power button to open it. On iPhone this works with the app closed; on Android it runs through the app. You decide whether music appears at all, and separately whether it may appear while you are moving.
Calls
An incoming call takes the screen, with the caller’s name and number, and your speed still visible. + accepts, − declines. Once you are on the call there is a full-width End control and a duration counter.
Group voice
Create or join a room with a six-character code. Push-to-talk, voice-activated with adjustable sensitivity, or open mic. Noise suppression is built in. On the intercom screen, push-to-talk is a hold of −. Music ducks automatically the moment someone speaks and comes back when they stop.
Taking a call or talking to your crew is a distraction wherever you do it. Do not do either where it would take your attention off the road.
Sharing and family limits
The same bike can be a 25 km/h learner’s bike for one rider and a full-power machine for another. The limits belong to the rider, not to the bike.
Inviting a rider
By email, or by QR code for someone standing next to you. People without an account get a pending invitation that activates when they make one.
Presets
| Preset | Limits |
|---|---|
| Beginner | 25 km/h (16 mph) · 2 kW · gentle mode only · no wheelie · no cruise · no reverse |
| Advanced | 60 km/h (37 mph) · 6 kW · two modes · cruise on · no wheelie |
| Pro | Unrestricted |
| Custom | Every limit set by hand |
Setting limits by hand
Speed limit · power limit · which riding modes · wheelie · cruise · regen · reverse · edit maps · edit layout · edit tuning · see bike location · use phone as key · and whether they may lift limits at all, which is off unless you grant it.
They are enforced on the bike, not in the app. Turning the phone off, going offline, reinstalling the app or getting a new phone does not lift them. You can change them remotely at any time, you see every rider’s trips, and each rider sees only their own.
Security and phone-as-key
Phone-as-key
The bike unlocks because your phone is near it. Settings: allow without phone · auto-unlock range · auto-lock when away · lock on app close · PIN backup · request and enter an unlock code · manage authorised phones. Face ID or your fingerprint protects the sensitive actions.
Ownership
The display is registered to your account and cannot be claimed by anyone else. If you sell the bike, transferring the display to its new owner clears settings, paired phones, the rider list and history from the display.
Anti-theft
The display detects and reports tampering, and protects the credentials it stores.
Software updates
Dash Pro is not finished. Three years of development stand behind the display on your bars, and the work has not stopped: the display you own in a year will do more than the one you bought.
How updating works
- Open More → Firmware update. The app checks for a newer version and shows you what has changed in it.
- Tap install. The update goes to the display wirelessly - no cable, no computer, nothing to take off the bike.
- The display confirms its new version on the next start, with an “Updated to version…” message.
A beta channel is available if you would rather see changes early and can live with the occasional rough edge.
Updates do not run while the bike is in motion. There is no way to start one mid-ride, deliberately or otherwise.
If something is not behaving
Software problems get fixed in software. A behaviour that is wrong today is a candidate for the next firmware release, and firmware reaches you over the air without anything being returned, opened or replaced.
So before you conclude that a fault is in the hardware:
- Check you are current. More → Firmware update tells you your version and the latest one. A surprising share of reported faults are fixed releases that have not been installed.
- Check the app too. The app and the firmware are updated separately, and some fixes need both.
- Report it. More → Help & support can attach a diagnostics bundle to your message. That bundle is what turns “it does something odd sometimes” into something that can be found and fixed.
New controller families, new bike models recognised automatically, new dashboard designs, new rider assists, and refinements to the ones already there. Support for a controller you do not own today is a plausible thing to receive for free tomorrow.
Water, dust and looking after it
The most common way a Dash Pro is damaged is water, and almost every case is avoidable. This chapter is short because the rule is short: never point water at the display.
What IP51 means
Dash Pro is rated IP51. The two digits are two separate tests.
What that means on a bike
| Situation | Where it stands |
|---|---|
| Dust, sand, dry trails | Within the rating. Ride. |
| Condensation, dew, a few drops standing still | Within the rating. |
| Sustained or heavy rain, and rain met at speed | Beyond it. Water arrives at an angle and with force, which is exactly what this seal is not built for. |
| Washing the bike, a hose, a jet at a fuel station | Well beyond it. Cover the display or take it off first. |
| A pressure washer | Never. Not at any distance, not at any angle. |
| Immersion, fording, deep puddles | Never. |
Damage caused by heavy rain, by washing the bike or by any pressurised water is not covered by your 24-month warranty. That is not fine print we would rather you missed - it is the single most common failure we see, it is entirely preventable, and telling you plainly is worth more than a footnote.
If you ride in weather, cover the display or take it off. If you wash the bike, take it off. It takes less time than reading this paragraph.
If it does get wet
- Power the display off, and do not power it back on.
- Let it dry completely somewhere warm and dry. Not with a heat gun, a hairdryer or an oven - heat does its own damage, and does it faster.
- Contact info@fabiride.com before you ride with it again. A display that has been soaked can work for a week and then stop.
Everything else
Problems and error codes
Errors appear as a full-screen message. If more than one is active they cycle every 2 seconds, and they clear themselves the moment the fault clears.
| Code | What it means | What to do |
|---|---|---|
| E1 | No communication with the controller | Check the cable at both ends. Check the protocol matches your bike. On single-wire controllers, run the automatic wiring check. |
| E2 | Wrong controller type | The controller connected is not the one selected. Change it in Bike and protocol. |
| E3 | Controller too hot | Stop and let it cool. |
| E4 | Motor too hot | Stop and let it cool. |
| E5 | Throttle outside its calibrated range | Stop, release the throttle, acknowledge. If it comes back, recalibrate or check the wiring. |
| E6 | Brake fault | The brake was held at startup, or the sensor has failed. Release the lever and acknowledge. |
| E7 | Motor sensor fault | Service required. |
| E8 | Overcurrent | Reduce load. If it repeats, service required. |
| E9 | Overvoltage | Check the battery and the charger. |
| E10 | Undervoltage | Charge the battery. |
Faults are only ever shown for parts genuinely connected through the display. On a hub kit, where throttle and brake go straight to the controller, those inputs are switched off and cannot raise a fault.
Clearing a throttle or brake fault
Stop. Put the throttle and brake fully at rest. Hold − and + together for 3 seconds.
The fault only clears if the input really is at rest and the bike really is stationary. That is deliberate: a fault you can dismiss while the throttle is stuck open is not a safety feature.
Common problems
| What you see | What to do |
|---|---|
| The display will not turn on | Hold the power button a full 3 seconds. Check the power connection. On SurRon and Talaria the display powers with the bike. |
| The app cannot find the display | Confirm you are signed in, because Bluetooth is off until then. Check Bluetooth is on and permitted. Check the display is powered. If another phone currently holds control, the display shows a chooser at a standstill - pick your phone there. |
| Phantom throttle fault | The wizard’s throttle routing answer is wrong for your bike. If your throttle goes straight to the controller, say so in the wizard or in Advanced settings. |
| Speed reads wrong | Check wheel diameter, rim and tyre, and rear sprocket. On moto wheels use rim + tyre, never a nominal inch figure. |
| No temperature shown | Not every controller reports it. Check the temperature setting is not switched off. |
| The range estimate looks wrong | It learns from real riding and needs a few rides to settle. Judge it after a week, not after a lap of the block. |
| Settings appear to revert | Update to the current firmware. See Software updates. |
| Music or calls not appearing | Check notification access is granted to the app, and that “show on display” is on. |
| Lost connection during a ride | Nothing to do. The display keeps working without the phone and recording resumes when it reconnects. |
Resetting
| Reset | Where | What it does |
|---|---|---|
| Trip | − and + together, 5 s | Clears the trip counter |
| Re-run the wizard | More → Setup wizard | Redoes guided setup |
| Forget paired phones | More → About | Clears phone pairings |
| Reset all settings | More → About | Returns the display to defaults |
| Factory defaults for the tune | Import and export settings | Restores default controller settings |
Getting help
info@fabiride.com, or More → Help & support in the app, which can attach a diagnostics bundle to your message. Send the bundle. It is the difference between a guess and a fix.
Your data and account
What survives what
| Data | Survives a power cycle | Reset by |
|---|---|---|
| Trip distance | No | Power cycle, or − and + held 5 s |
| Ride time | No | Power cycle |
| Session max and average speed, max power, consumption | No | Power cycle |
| Total distance | Yes | The app only |
| Throttle and brake calibration | Yes | Recalibration |
| Wheelie standing-zero | Yes | Recalibration |
| All display settings | Yes | Reset all settings |
| Bike settings and tunes | Yes | – |
| Ride history | Yes | Deleted per ride |
| Rider permissions | Yes | The owner revoking them |
| Serial number | Yes | Never erased |
Glossary
Terms of use
Written to be read. If any of it is unclear, that is a fault in the writing and we would like to know: info@fabiride.com.
A. What you bought, and what you licensed
You own the display. You do not own the software on it, or the app: those are licensed to you, for as long as you own the display, for use with FabiRide products. The licence is personal and non-exclusive, it transfers with the display when you sell it, and it does not let you copy, resell, reverse-engineer or redistribute the software on its own.
B. Software is not finished, and that is the point
Dash Pro is designed to be improved after you buy it. FabiRide releases firmware and app updates from time to time, and they arrive over the air at no cost.
Two things follow from that, and both are in your favour more often than not:
- Software faults are normally resolved in a software update rather than by replacing hardware. If something the display does is wrong, report it. The usual outcome is a fix in a subsequent release, delivered to every display, without anything being sent anywhere.
- What the product does will change. Updates add features, add support for more controllers and bikes, and refine what is already there. They may also change or retire behaviour where safety, reliability or a third party’s platform requires it. Where a change removes something you relied on, it will be described in the release notes rather than left for you to discover.
Updates are optional in the sense that nothing installs itself. They are not optional in the sense that support, and some features, assume a reasonably current version.
C. Warranty
Every Dash Pro carries a 24-month warranty from the date of purchase. Register the display to your account when you set it up: that registration is what the warranty hangs off, and it is also what stops anyone else claiming the unit as theirs.
The warranty covers defects in materials and manufacture. It does not cover:
- Water damage from heavy rain, washing the bike, or any pressurised water. Dash Pro is rated IP51, which is dust protection and protection against water falling straight down. It is not a rain rating and it is not a washing rating. See Chapter 18, which explains this properly rather than burying it here.
- Immersion of any kind.
- Impact, crash and drop damage, including a broken screen.
- Damage from incorrect installation or incorrect wiring.
- Damage from opening or modifying the display.
- Normal cosmetic wear.
Your statutory rights as a consumer are separate from this warranty and are not reduced by it. [[TBC: statutory rights wording, EU consumer guarantee period and the claims procedure - to come from the legal owner]]
D. Riding, limits and the law
Dash Pro can restrict your bike and can lift that restriction. Both are your decision and both are your responsibility.
- Road-legal speed and power limits vary by country and by vehicle class. Setting the bike above them is for closed roads, private land and off-road use.
- Removing a restriction may affect your insurance, your registration and your bike manufacturer’s own warranty. FabiRide’s warranty on the display is not affected by what you set the bike to.
- The rider assists reduce risk. They do not remove it, they do not promise to intervene, and they are not a substitute for riding within your ability.
- Crash detection can detect a crash. It cannot guarantee to detect one, and it may occasionally trigger without one.
E. Your account and your data
You are responsible for your account credentials and for who you invite to your bikes. A rider you grant permission to can use your bike within the limits you set, and can see what those permissions allow them to see.
What is collected, how it is stored and how to export or delete it is set out in Chapter 20 and in full in the privacy policy, reachable from More → Help & support. [[TBC: privacy policy URL]]
F. Support
Support is at info@fabiride.com and through More → Help & support in the app. Attaching a diagnostics bundle is the single most useful thing you can do for a technical problem.
FabiRide ships worldwide from Lithuania.
G. The rest
[[TBC: governing law, jurisdiction, company registration details, limitation of liability, and the dispute-resolution route - all to come from the legal owner. These are the only clauses in this document that have not been written, and they are left blank deliberately rather than filled with plausible text.]]
Compliance and conformity: [[TBC: CE marking statement, declaration of conformity reference, WEEE and battery disposal statement - to come from the legal owner]]
